header ad

Showing posts with label #design. Show all posts

Sunday, 6 April 2014

Designing the kitchen & getting quotes

The most exciting part of planning a new kitchen, is visiting kitchen showrooms & sitting down with the designers to work on your dream kitchen.

We had a budget in mind but we had no idea how much kitchens could cost, only once we had seen a few companies realised that out budget would not go anywhere near what we would like to have!!

On a mission to keep the kitchen price as low as possible, I had 12 quotes (which definitely gave a good indication of how varied kitchen prices can be).

Some of the big name High Street kitchen suppliers quoted extremely high prices, and then offered a huge 50% discount & £1000 worth of appliances.

In actual fact they would never sell a kitchen at the initial price quoted.

Magnet was one of these companies, first quote £35,000, they then reduced the price by half with their supposed huge discounts.
They called every few days to push you into ordering, each call they reduced the price even further, all for the exact same kitchen design.

We couldn't be bothered wasting time with these companies who wanted to trick people into paying these ridiculous prices.

We saw some local independent companies who had lovely quality kitchens but in the end just out of our budget.

We received quotes from all of the usual High Street suspects:
Howdens, Wickes, B&Q, Benchmarx, Ikea

I wasn't impressed with Howdens quality (on the Gloss Handleless style), the edges were an ABS stripping rather than a fully lacquered door.

Out of all the above brands Wickes was very nice quality.

We found out that Benchmarx & Wickes have the exact same kitchen ranges, as they are both owned by parent company Travis Perkins.

You will need a trade account to make a design appointment with Benchmark (you can ask your builder to set up an account).

Benchmarx was only slightly cheaper than Wickes, around 5% cheaper for the same design but both companies offer a price match service.

The advantage with Benchmarx is that they have the stock available immediately and the cupboards are delivered as finished units.

Throughout the process it became difficult to compare prices because each company offered different types of appliances and worktops.

I decided to focus on the kitchen units only, as we were sourcing the worktops & possibly the appliances ourselves.

The 12 kitchen quotes varied in price from
£4000 - £13,660 for the exact same design, units only.

Here are some of the CADS we received from the various companies:
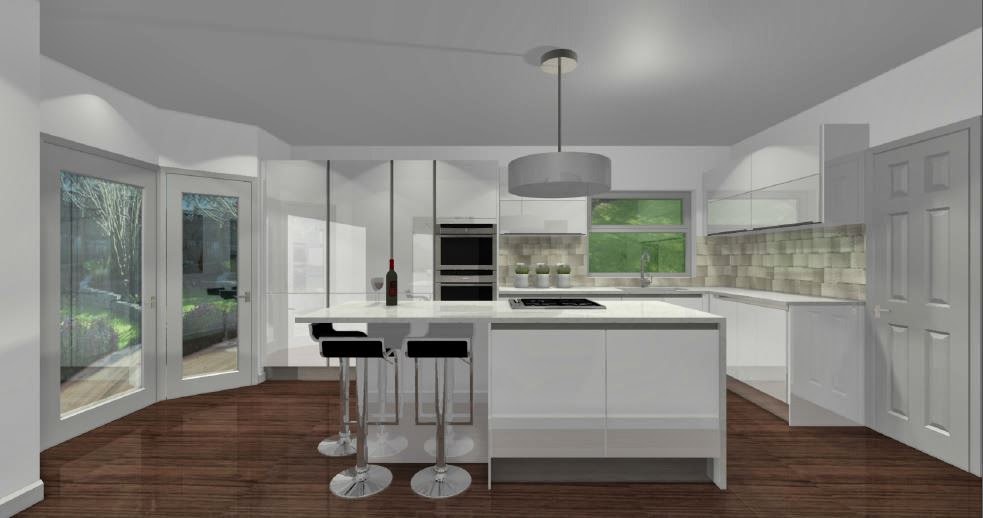


Saturday, 1 February 2014

Planning the kitchen renovation...

The first room in our house that needs major attention is the kitchen.


It looks ok in the estate agent's photo (above) but they somehow manage to make the worst rooms look respectable with their wide angle photos.

The kitchen is much darker in reality.

The main issue is (besides it being quite old & dated) is the lack of cupboard space.

The brown cupboards you see in the below photo are taken up with appliances - dishwasher & washing machine.

The white pantry next to the hob (below photo) has shelves that are about to come away from the wall, it's not sturdy enough to utilise. 


All other free standing units you can see in the photos belong to the previous owner, which have now been removed.


Resulting in no cupboards!!

The kitchen is 5m x 3.3m, excellent size, we have a great space to work with.

We plan to totally renovate and put in a new kitchen.

The ideas we have so far are:


  • remove the brick chimney
  • the current back door to be bricked up & replaced with a new UPVC window
  • replace the bay window with a new UPVC bay window with central double doors leading onto the garden
  • Remove the wall between the hallway & kitchen 
  • New flooring
  • Underfloor heating
  • New L shape kitchen with central island
In the below image you can see the current back door.
We intend to move this so we can have an 'L' shape kitchen to utilise the space better.


We will still keep a window here above the worktop (as we need as much light in the kitchen as we can get).

Our builders will brick up the bottom half of the door area and a new UPVC double glazed window will be fitted.

The new window will have a slight change to the size, it will be brought in approx 400mm from the end wall, this will enable us to put kitchen wall units on the end wall.


The new back door will be at the far end of the kitchen where there is currently a bay window.


This is the bay window that will be changed into double doors & 2 side windows.

We will keep the shape of the bay window but replace it with a UPVC double glazed floor to ceiling bay with 2 narrow centre doors opening outward to the garden (similar to below photos)


Idea for new Bay Window / Door

The bricks that will be removed from below the current bay window will be re-used to brick up the bottom half of the existing back door.
Therefore the exterior of the house will remain the same colour.

The wall between the hallway & the kitchen will be removed (highlighted in red below)


The reason for removing this wall is because as you can see from the below floor plan, the current entrance (being the RED LINE) requires you walk around tight corners to enter.

If we remove this wall we will have direct access into the kitchen from the hallway (see GREEN LINE as proposed new entrance). 

We will then extend the 'under stairs cupboard space' right up to the kitchen.
The space will then be used for a washing machine & dyer stacked on top.
I will be able to access these appliances directly from the kitchen.
A new door will be made to hide these appliances.

To gain access to the rest of the space under the stairs, doors will be cut out & open directly from the hallway.

This is the plan, lets see how it goes!!...


Sunday, 26 January 2014

Our Main Bedroom DIY attempt


When we moved in back in October, the first thing I wanted to change was the colour of the walls in the main bedroom.

Although it looks great in the photo, the burgundy walls were just too dark.

We began our first attempt at DIY and bought the paint, new rollers, prepared the walls washing them down with sugar soap and covered the flooring.

Excited to transform this room we began painting, it soon became apparent that this could possibly take us forever.

No matter how many coats of paint we applied, the dark burgundy was still showing through!!

After 3 long days of struggling to achieve a decent finish, we accepted we needed a professional to give the finishing coat.

I reluctantly called our builder to arrange for someone to come and finish the room.

They did a great job and it was finished in a day.

We chose Dulux 'White mist', this is my go to colour, it's not a stark optical white, it has a slight grey tinge to it and we have painted many rooms in a previous property this colour & it has always worked.

During the painting our builders did find a damp issue underneath the bay window, one of the wooden sashes is rotten and we'll need to have it replaced (something we are still yet to address).

Here's the transformation...

BEFORE


DURING


AFTER


There's still a few things to finish off eg: paint the bedside tables & add some more artwork to our walls to inject some colour.

Get the look:

Duvet: The White Company 
http://www.thewhitecompany.com/sale/bed-linen/genoa-bed-linen-collection--eucalyptus/

Bed: John Lewis
http://www.johnlewis.com/house-by-john-lewis-maine-bedstead-kingsize/p368344?colour=White

Wardrobe: Furniture Village -http://www.furniturevillage.co.uk/Inventory/Bedroom/Welle-System-300/4-door-wardrobe-with-polished-doors-8386.aspx

Mirror: Homesense
http://www.homesense.com/page/department_finishing_touches

Touch Lamps: Homebase
http://www.homebase.co.uk/webapp/wcs/stores/servlet/ProductDisplay?langId=110&storeId=10151&partNumber=074825

Chest of Drawers: 2nd hand - Try searching ebay or the gumtree for similar

Dresser: 2nd hand Try searching ebay or the gumtree for similar

Chair: upcycled, an old chair I painted & reupholstered Try searching ebay or the gumtree for similar 


Sunday, 12 January 2014

Welcome...

Hi, my name is Ralph and together with my wife Susan, we have recently bought a beautiful Victorian terrace in North London. 

Getting to this point was hard enough in a competitive London property market but now the hard work really begins to renovate this property which has been rented out and thus not been decorated for years into our dream home.

Let's start at the beginning and show you around.


Firstly, the front of the house. 

The house is a three-bedroom end of terrace with a red door & decorative stained glass, period sash windows and the prerequisite turret which my wife demanded. Although we don't anticipate any major changes to the front of the property, as it was essentially what we fell in love with, repairs will be required to some of the pointing and most of the white paintwork needs refreshing.

The front room is large with high ceilings and numerous period features such as wooden shutters for the windows, 7-arm chandelier with ceiling rose, cast iron radiators and a stunning marble fireplace.


Living Room 

Open plan Living / Dining Room

The living room leads onto the dining room in an open-plan arrangement which creates a light and airy living space. 
The dining room has the same period features as the living room.
Identical 7-arm chandelier, a 2nd marble fireplace, polished floorboards, cast iron radiators and French doors leading out to the garden.


Dining Room with double doors leading to the garden

Through the hallway to the back of the house is a separate WC and then onto the kitchen.
The kitchen is a great size 5m x 3.3m but is looking a little tired and has limited storage so this is the first room that we will renovate.


Kitchen

At the back of the kitchen is a bay window that looks out over the garden.
The garden (or should I say courtyard) is small, we had to compromise somewhere and this was it, great size house but small garden.
Although with some TLC I'm sure we'll have this garden looking inviting in no time.

Garden

So now lets head upstairs to rest of the house...

At the top of the stairs, directly in front of you is the 2nd bedroom, it's a great size room and fits a king size bed very comfortably.
This room only needs some decorating & to remove a noisy boiler and relocate this to the kitchen which is directly underneath.
This room overlooks the garden but unfortunately the house backing directly onto ours can see straight into this room so we'll have to come up with some clever tall tree planting in the garden for privacy!!

Second bedroom

Next to this bedroom is our bathroom, this is on the small side 1.8m x 2m so only enough room for toilet, basin & shower / bath.
It's in keeping with the period styling of our property navy tiling, burgundy wallpaper and bronzed mirror panels so it is quite dark, we will be modernizing as soon as possible.
The shower pressure is terrible and some plumbing work will need to be carried out.

Bathroom

Along the hallway on the other side of the bathroom is the 3rd bedroom.
This is the smallest out of the three bedrooms but still a good size approx. 3m x 3m.
It's a lovely light filled room with a large sash window that looks over the side of our back garden.
Nothing much to do in here except some painting & decorating.

Third bedroom

The last room in the house to show you is the main bedroom, situated next to the 3rd bedroom at the front of the house.
It's huge, the most spacious room in the house.
Filled with period features, large bay sash window with wooden shutters, cast iron radiators, ceiling rose and its own original Victorian cast iron fireplace with gorgeous floral tiling surround.

Main bedroom

As lovely as the burgundy walls are they just have to go, it's the first bit of DIY we will do, they're just too dark and make the room feel much smaller than what it is. We'll be painting the room white.

So we hope you enjoy our Victorian Terrace Transformation, I'm off to buy some paint!!